Operating Systems Module at University of Roehampton
System Planning and Distribution Selection
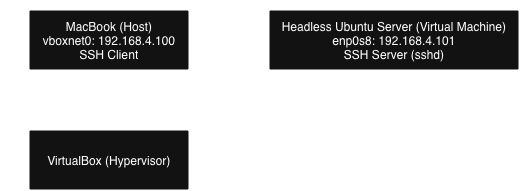
System Architecture Diagram
Distribution Selection Justification
I chose to use the ARM64 version of Ubuntu Server. This is widely adopted in enterprise for good reason, as it offers a balance of stability and usability. This is important as it would be my first time configuring a Linux server. Ubuntu Server is easy to use, offering strong documentation and simple package management for additional software that may be needed for future tasks of the coursework.
This is in comparison to CentOS Stream, another server distribution which requires more manual configuration for installing software packages. Another distribution I considered was Debian, a popular and stable operating system. However, I decided against using Debian as it is less up-to-date, as it has a slower release cycle. In addition, Debian requires more configuration for security, while Ubuntu Server is more automated, speeding up the time it will take to set up my VM.
Ubuntu Server is also clearly the best option due to its simple and guided installation process, which is intuitive and requires less manual setup and knowledge to get started. It is designed to be accessible for new Linux users, with beginner-friendly documentation and simple package management. This is in contrast to CentOS Stream or Debian, which require more configuration knowledge with their more complex setup processes.
These distributions are more geared towards experienced server administrators, and require more learning than would be possible during the timescale of the coursework.
Workstation Configuration
My workstation is a MacBook Pro with the macOS Tahoe (version 26) operating system installed. This is my primary device, and is good for virtualisation due to the Apple Silicon ARM architecture and Apple’s virtualisation and hypervisor frameworks. Due to said CPU architecture, the version of Ubuntu Server I have to install will have to be the ARM64 build due to the performance issues that would be introduced.
macOS is part of the UNIX family of operating systems, which has many similarities with Linux. This reduces compatibility issues as a lot of the kernel level features are the same, meaning the virtualised server will be more stable and performant. UNIX-based hosts such as macOS also come with Linux tools such as built-in SSH via the Terminal, which means connecting to the server will be easier, not requiring the installation of PuTTY like on Windows hosts.
Network Configuration
When configuring the network connection between my server VM and my workstation, I will use the "Bridged Adapter" option within VirtualBox to ensure the server VM is hosted on the same network as my workstation. This connects the guest network interface to the host's, appearing as a seperate device on the local network. This allows connection to the guest machine via SSH without requiring port forwarding or NAT to be configured. This means that the server VM can be connected to from the local machine with a simple SSH connection.
System Specifications
The specifications of my server VM are as follows:
- uname: Linux
- Total Memory: 1954MB
- Free Memory (idle): 1579MB
- Buff/Cache Memory: 216MB
- df -h:
Filesystem Size Used Avail Use% Mounted on tmpfs 196M 1004K 195M 1% /run efivarfs 256K 16K 241K 6% /sys/firmware/efi/efivars /dev/sda2 24G 2.8G 20G 13% / tmpfs 978M 0 978M 0% /dev/shm tmpfs 5.0M 0 5.0M 0% /run/lock /dev/sda1 1.1G 6.4M 1.1G 1% /boot/efi tmpfs 196M 12K 196M 1% /run/user/1000 - ip addr:
1: lo: - lsb_release: No LSB modules are available.
uname, free, df -h, ip addr, and
lsb_release commands to provide the above system specifications.
Security Planning and Testing Methodology
Performance Testing Plan
In my performance testing plan, I will monitor my server VM's metrics to ensure system stability, and collect
data
for capacity planning.
For remote monitoring, I will use the htop tool to view processes running, iostat to
see CPU statistics,
netstat to view current network connections and bandwidth usage, and vmstat to see
how much virtual memory is being used, so I can increase the "physical" memory if required.
Key performance indicators (KPIs) I will track will include:
- CPU Utilisation
- Memory Usage
- Disk I/O
- Network Throughput
stress-ng and sysbench.
Security Configuration Checklist
I will edit the SSH configuration file editing various settings to ensure the security of my VM instance. While the risk of attack is low as it is on my own local network, security measures are still implemented to follow best practice.
- Using key based authentication instead of passwords, as these cannot be as easily stolen/brute forced.
- Installing "Fail2ban", this is a tool that bans IP addresses that show malicious behaviours like too many password attempts.
- Configuring a firewall using the
ufwcommand, only allowing necessary ports for SSH and HTTP(S). - Enable
unattended-upgradesto automatically install security updates. - I could scan for open ports that don't need to be open, to tighten security.
Security Threat Model
My threat model will identify three security threats and propose mitigation strategies for them.
- Unauthorised Access: The mitigation for this would be to use strong passwords, or to use the key-based authentication that I mentioned above. This would prevent access to the server VM from bad actors.
- Malware/Ransomware: If malware is unknowingly installed on the system, data could be stolen or the
system could
cease functioning, meaning that my coursework would be disrupted. Mitigation for this includes enabling
unattended-upgrades(as mentioned above), and potentially installing an antivirus program. Backups of the virtual machine, saving its state at each stage so that I can rollback at any time. - Denial of Service (DoS) Attacks: Fail2ban and firewall configuration can be used to prevent an attacker flooding my system with malicious traffic which would prevent me from working. In addition, I could configure rate limiting preventing an influx of requests fron a single IP address.
Application Selection for Performance Testing
Application Selection Matrix & Installation Commands/Documentation
| Workload Type | Application Install Command | Description | Justification |
|---|---|---|---|
| CPU Workload | sudo apt install -y stress-ng |
Produces synthetic CPU stress tests using multiple threads to test whole processor performance. | Good for controlled benchmarking of CPU performance. Gives consistent results and is very customisable. |
| RAM Workload | sudo apt install -y stress-ng |
Allocates and stressed RAM through consistent methods. | The tool will already be installed for the CPU benchmark, so it is efficient to use the same tool. Simple to script for repeatable, consistent tests. |
| I/O Benchmark | sudo apt install -y fio |
fio is a professional grade storage benchmarking tool that simulates reads and writes. | Highly configurable and industry standard for storage testing, meaning any results I get from this benchmark will be of good quality. |
| Networking Benchmark | sudo apt install -y iperf3 |
A widely used network performance tester. Important for a server. | Provides clean measureable data. Perfect for bandwidth and latency tests. |
Expected Resource Profiles
Based on the selected applications, I anticipate the following resource behaviors:
- CPU Tests: The
stress-ngCPU stressors should drive user-space CPU utilization to near 100%. I expect to see the system load average rise significantly above the number of available cores (which is 2 in this VM). This will verify if the virtual CPU allocation is sufficient for high-demand tasks. - Memory Tests: RAM stressors will rapidly consume available memory. I anticipate seeing the "free" memory drop close to zero. If the stressor exceeds physical RAM (approx 2GB), I expect to see swap usage ("si" and "so" columns in vmstat) increase, resulting in degraded system responsiveness.
- I/O Tests: The
fiobenchmarks will saturate the virtual disk controller. I expect high read/write throughput and a notable spike in "iowait" percentages during heavy random access tests, which will help benchmark the underlying storage performance. - Network Tests:
iperf3should saturate the virtual network adapter. I expect to see consistent throughput matching the provisioned bandwidth of the bridged adapter, potentially reaching gigabit speeds on the local network.
Monitoring Strategy
To effectively capture performance data during these tests, I will employ a "split-terminal" strategy using two simultaneous SSH connections:
- Terminal A (Load Generator): This session will execute the benchmark commands (e.g.,
stress-ngorfio). - Terminal B (Monitor): This session will run real-time monitoring tools. I will use
htopfor a visual overview of processes andvmstat 1to capture second-by-second granular data on memory, swap, and CPU activity.
For the final report, I will pipe the output of the monitoring tools to log files (e.g.,
vmstat 1 > cpu_test_log.txt) to generate graphs. I will also verify system stability by checking
dmesg or /var/log/syslog for any kernel errors or OOM (Out of Memory) killer events
that may occur during the stress tests.
Initial System Configuration & Security Implementation
Configuring SSH with key-based authentication
I started by generating an ed25519 key pair with my student email on my workstation.
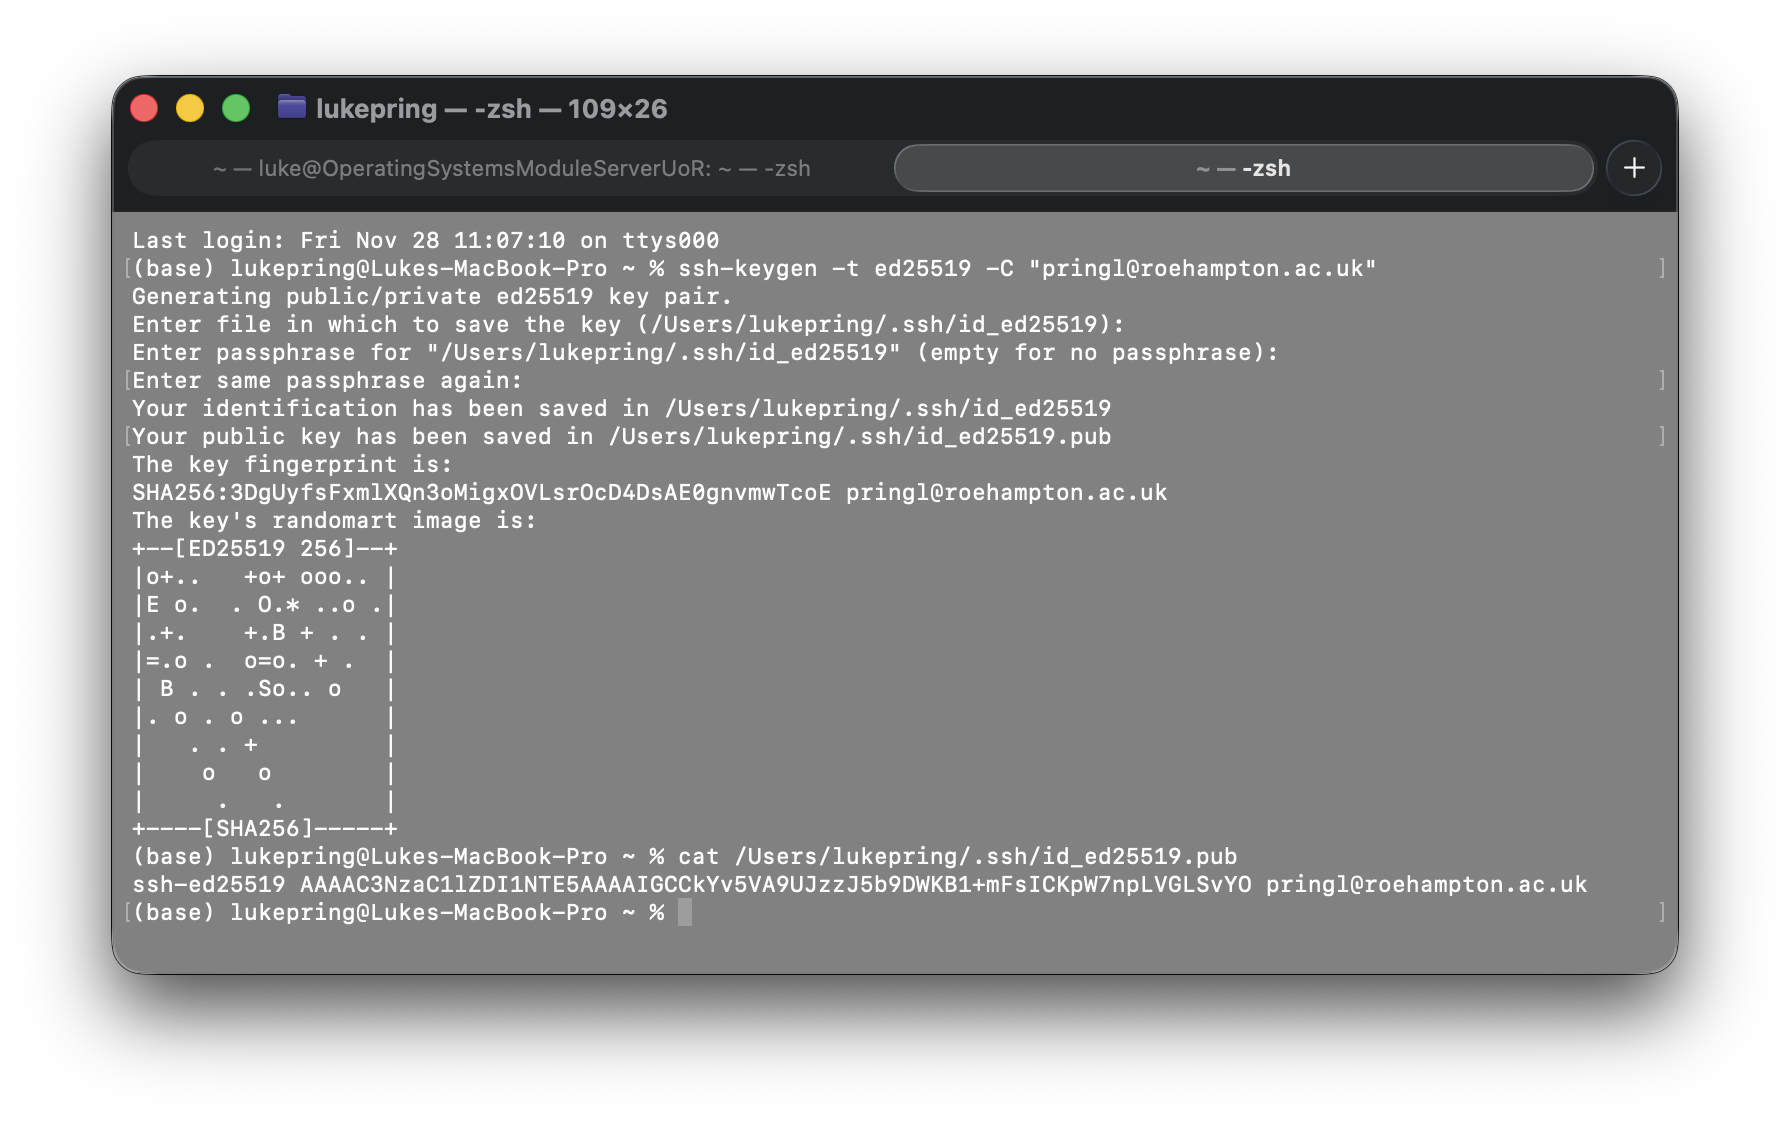
After this, I copied the key to the server using the ssh-copy-id command. I had to specify the
SSH port by using the -p flag. The result from entering this command was:
/usr/bin/ssh-copy-id: INFO: Source of key(s) to be installed: "/Users/lukepring/.ssh/id_ed25519.pub"
/usr/bin/ssh-copy-id: INFO: attempting to log in with the new key(s), to filter out any that are already installed
/usr/bin/ssh-copy-id: INFO: 1 key(s) remain to be installed -- if you are prompted now it is to install the new keys
luke@127.0.0.1's password:

Number of key(s) added:        1
Below is a screenshot displaying a passwordless login using the key I generated. The passphrase for the key is stored in the keychain on my Mac.

To harden my SSH configuration, I first backed up my initial configuration file using the cp
command. Then, I edited the configuration file using sudo nano /etc/ssh/sshd_config. I
uncommented the PasswordAuthentication line and set it to no. I also uncommented the PubkeyAuthentication line
and set it to yes. I then restarted the SSH service using sudo systemctl restart sshd.


These changes improve security by removing the ability to authenticate with a password, which is less secure as it can be easily brute forced, and passwords can be potentially stolen.
In addition, disabling root login improves security by reducing the attack surface, since hackers can no longer target the root account which is fully privileged.
Configuring a firewall permitting SSH from one specific workstation only
To implement firewall rules, I first checked UFW was installed using sudo apt install ufw.
Once I had confirmed UFW was installed, I then began setting the rules for my firewall. I used the commands below:
  sudo ufw default deny incoming
  sudo ufw default allow outgoing
  sudo ufw allow from 10.0.2.2 to any port 22
  sudo ufw enable
After running these commands, I tested the firewall by trying to connect to my server via SSH from my workstation. I was able to connect successfully. Below is a table explaining each rule I set, and a screenshot from the VM documenting the ruleset.
| Rule | Explanation |
|---|---|
| sudo ufw default deny incoming | This rule denies all incoming traffic by default, which helps prevent unauthorized access to the server. |
| sudo ufw default allow outgoing | This rule allows all outgoing traffic by default, which helps ensure that the server can access the internet and other resources. |
| sudo ufw allow from 10.0.2.2 to any port 22 | This rule allows SSH traffic from the workstation IP address (10.0.2.2) to the server on port 22. |
| sudo ufw enable | This rule enables the firewall, making the ruleset active. |

Managing users and implement privilege management, creating a non-root administrative user
It is good practice to have a non-root user with sudo permissions, as it reduces the attack surface of the system.
First, I created a new user using the sudo adduser adminuser command.
Then, I added the user to the sudo group using the sudo usermod -aG sudo adminuser command.
To verify that the user was added to the sudo group, I used the groups adminuser command.
I also used the id adminuser command to verify that the user was added to the sudo group.
To test sudo access, I used the following commands:
  su - adminuser
  sudo apt update
  whoami
  getent group sudo
Below are screenshots displaying the process of creating a user. The principle of least privilege is important because it reduces the attack surface of the system.


Remote Administration Evidence
Administrative commands via SSH:

Interactive shell via SSH:

Advanced Security and Monitoring Infrastructure
Implementing Access Control using SELinux or AppArmor
To identify which access control system is installed, I used the sudo aa-status command. I
thought this would be the best command to try first as AppArmor is a common access control system on Ubuntu,
which is the distribution I am using. The command confirmed that AppArmor was installed and running.
To examine a specific profile, I used the sudo cat /etc/apparmor.d/usr.bin.tcpdump
command. This profile is used to control the permissions of the tcpdump program.
Below is a screenshot showing the result of this command:

AppArmor is a security module for Linux, commonly used in Ubuntu, that provides a mandatory access control (MAC) system for the Linux kernel. It is a security module that is used to enforce access control policies on the system.
Looking at the profile above, I was able to identify the permissions granted to tcpdump. The profile grants the program the network and capability permissions required for raw packet capture, including net_raw and net_admin. It allows controlled read/write access to pcap files, system network information, USB devices, and terminal output, while explicitly denying access to sensitive user files and binaries. This enforces least privilege while allowing tcpdump to operate correctly.
I used the following commands to view the profiles in different modes:
  sudo aa-status --profiled
  sudo aa-status --enforced
  sudo aa-status --complaining
Below is a screenshot showing the results of these commands, showing the number of profiles in each mode.

The difference between enforce and complain mode lies in how they deal with a program performing unauthorised actions. In enforce mode, AppArmor will deny the action and log a message. In complain mode, AppArmor will allow the action and log a message.
Configuring automatic security updates
To configure automatic security updates, I first installed the unattended-upgrades package using the
sudo apt install unattended-upgrades command.
Then, I configured the package manager to automatically update packages using the
sudo dpkg-reconfigure -plow unattended-upgrades command.
Below is a screenshot showing the results of these commands:

Below is a screenshot showing the dpkg-reconfigure command:

To verify the service is running, I used the sudo systemctl status unattended-upgrades command.
It returned active (running).
To view the configuration of unattended upgrades, I used the
sudo cat /etc/apt/apt.conf.d/50unattended-upgrades command.
An update log can be viewed using the
sudo cat /var/log/unattended-upgrades/unattended-upgrades.log command.
Configuring fail2ban for enhanced intrusion detection
I first installed fail2ban using the sudo apt install fail2ban command.
To ensure the service was running, I used the sudo systemctl status fail2ban command. The result
can be seen below:

Fail2ban is a security tool that monitors log files and bans IP addresses that are suspected of being malicious. It can be configured to monitor different types of log files and can be used to block suspicious activity.
To create a local configuration file, I used the command
sudo cp /etc/fail2ban/jail.conf /etc/fail2ban/jail.local
And then edited the config using the sudo nano /etc/fail2ban/jail.local command. Below is a
sceeenshot showing the configuration changes I made to the sshd section of the file:

After making these changes, I restarted the fail2ban service using the
sudo systemctl restart fail2ban command.
To verify the service is running, I used the sudo systemctl status fail2ban command. The result
can be seen below:

Fail2ban is now configured to monitor the sshd service and ban IP addresses that are suspected of being malicious.
Below is a screenshot showing the monitoring of Fail2Ban:

Creating a security baseline verification script that verifies security configurations
To create my security baseline script, I used the command nano security-baseline.sh and entered
in comprehensive security checks. Below are screenshots showing the script:


After creating the script, I made it executable using the chmod +x security-baseline.sh
command.
To run the script, I used the ./security-baseline.sh command.
Below is a screenshot showing the results of the script:

Creating a remote monitoring script to collect performance metrics
Similar to my last task, I created a remote monitoring script on my workstation using
nano monitor-server.sh
to collect performance metrics. Below is a screenshot (from macOS nano) showing the script:

After creating the script, I made it executable using the chmod +x monitor-server.sh
command.
To run the script, I used the ./monitor-server.sh command.
On my first time running the script, it failed as I hadn't set the SSH port correctly. The script expects to use port 22, which is the default SSH port. However, as I'm using the VirtualBox NAT network, I needed to use port 2222.
Below is a screenshot showing the results of the script:

